Thursday, 11 July 2013

DIY Felt Picnic basket and food


Oh my goodness.. this may be the funnest project I have done so far!!! So easy and creative. I found a lot of  my patterns on pinterest and some I made up. If anyone is interested I will put up a tutorial :)


Maybe its more of a suitcase than a picnic basket.. but isn't it so cute? I saw one that I loved but couldn't find a pattern so made it up as I went along. I especially like the cute ladybug fabric that's inside. 


You've got to have a sandwich for your lunch! This was so much fun to make :) I used a good old piece of bread as a template! Next time I will make the ham/salami different and I will make the cheese all holey!

Good enough to eat :) 

So my first attempt at an apple was a fail! But it does kinda look like a watermelon right? I knew I was progressing in my skill when I would show Levi something and say, "whats this levi" and he would answer correctly. Its just fun working out what works and what doesn't.


And of course you need a wee treat! Next time I am going to make cake I think. Like a slice of cake. Mmmmm! 

I am addicted to felt! Its seriously amazing to work with. My love affair has just began I think :) 
Hope you are all well and surviving winter. 

love me xoxo

PS: Click here to see my Pinterest board with all my felt food pins :)


Sunday, 19 May 2013

Celebrating mums


I was listening to Shine tv (Christian channel) while sewing last week.. there was a show on, I cant remember the name of it. But it was talking about family and marriage, and making the family unit healthier and stronger. I cant tell you everything, cause I cant remember, but one thing that stood out was creating traditions for your family. Traditions around events, like Christmas or Birthdays, or even just things that you do as a family, that are special. And since listening to this I have spoken to a couple of friends about their family when growing up, and they have stories of family camping holidays every year, or a bbq at a family friends house for some event or other. They all seem to remember this memory warmly. How much fun that we get to now create these traditions for our family!! Exciting :)

Just recently we have started having family picnics. And since we live in a less than tropical climate sometimes we have our picnics in the lounge on our picnic blanket :) But it's amazing how much these small things, this pretty easy activity, makes Levi so flippen excited!! Seriously, this is how many of my conversations go now "what fun thing do you want to do tomorrow Levi?" 9 out of 10 times the answer is "family picnic mummy". Cuteness right?! So anyway I was telling Stevo about what this show I was watching, and he said "what tradition can we start for mothers day?" We thought of a couple of things and then settled on mothers day brunch!! Who doesn't like brunch?!

Plus, and probably more importantly, I really want to develop an attitude of honouring in my children. And I know that mothers day is an over commercialized way for businesses to get more money. And, yes, we should celebrate our mums everyday, not just on one day of the year. But why not also do something special on this day? Its not like you can over bless your mum now can you? Mums do an awesome job and I know that I would find life a whole lot harder if I didn't have my mum around. She is seriously the most amazing mum, and I am not just saying that. She has sacrificed a lot for me! Sucks to be you that you didn't have my mum.. just kidding :)

Anyway, since I am a huge invite girl, we made invites and I got excited about table decorations and making everything pretty. I didnt end up having enough time to make it all happen, but there is always next year!!

Invites we made :) 
Table all ready for the guests :)

I hope you celebrated your mum this year! She does, after all, do (or maybe did) a lot for you. I'm excited by this new family tradition!! Won't it be fun, if 30 years from now, we're still doing it?! Our first one didn't go exactly as planned.. the smoke from the bacon (yummo) set off the fire alarms, which wouldnt turn off for about 30mins. Not ideal!! But anyway, was a fun morning anyway.

xoxo L

Monday, 4 March 2013

DIY Tile Wall Art


I kicked my bottom into gear today.. my mums birthday was in January and STILL I hadn't done her birthday present. I've had all the bits and bobs for it for ages so today is the day!!
I found this idea on the net and thought.. hey.. it looks easy and fun. Now that its done I can say.. Its SUPER easy if you follow these steps (learn from my epic failures:)

What you need:

  • Tiles (I got mine from a lovely friend after she did renovations)
  • Pictures (Measure the tile and crop an image you have to fit the tile. I made mine a mm bigger so I could allow for terrible cutting:) You can use just normal computer paper and printer. I had to get mine printed at a print shop because we dont have a printer)
  • Mod podge (type of glue.. you can get it from Spotlight. I got a giant bottle for $29 I think.. but only used a tiny bit of it)
  • Paintbrush
  • Total cost (dont look mum:) under $10 for 9 tiles.
And wallah you have a unique, inexpensive picture for your wall (or my mums wall in this case)

(Excuse the photos.. taken at night (kidlets asleep) and hard to take nice photos when hands covered in glue!)

Step one- Gather everything you need :)

Tiles and pictures
Mod podge and paintbrush

Step Two- Cut pictures at neatly as possible. I tried to use my guillotine thing but found I was far more accurate with good old scissors.


Step Three- Paint back of picture with modpodge. I found doing the tile as well helped the stickyness of it all. But don't faf too much because you don't want the modpodge to dry.


 Step Four- Stick the picture onto the tile and position so its in the center spot of the tile. Then run a heavy object (like another tile or a book) over the surface of the picture to get ride of the bubbles. I tried using a non heavy object so half my pictures are bubble fests :(


Bubble fest!!! SIGH!

 Step Five- Mod podge the front of the picture. I was freaked out that it was too thick but it dries clear :) If you use normal computer paper, it will run a little so you can make it look arty. My paper was slightly glossy because that's what the print company printed my pics on.


 Step Six- If you have a little overhang on the side of the tile. You can sand paper it off. The directions I used said to do this step before you modpodge the front of the pic. Might try this next time, but it worked fine. And also might try make the picture long enough so it wraps around the whole tile.


What not to do: Dont touch it before its done drying.. otherwise this happens :(


And TA DA.... wall art!


Seriously this may be my new way of putting pictures on the wall!! Now you may be asking how I plan to stick them on the wall. When the they are completely dry.. which will take a couple of hours I am going to stick some picture hanger hook things that I got from Spotlight on the back of them. I'm thinking of either using super super glue or no more nails. We will see.
Well this was fun. Can't wait to do more!!!
xo Lau

Sunday, 3 March 2013

Avie doing 5 months old like a BOSS

I'm really LOVING being a mum! I'm finding it much easier second time around for some reason. I think I have a lot less expectations about how it's supposed to be and just enjoying the ride. Aviya is a gorgeous wee girl.. so full of laughs and fun! Man I am a blessed lady!! 


Kylie's Deep Dark Chocolate Cake

Possibly the easiest and yummiest moist rich chocolate cake. Its never failed for me! So yum. Seriously.. make this cake!
Yay for having a friend with a birthday so I could do some baking :) I really need to get more organised because the icing (the bit that makes it look pretty or not so pretty) is always done in a rush and ends up looking.. well.. less than delish :)


Mmmmmm.... my handy helper. Seriously he had chocolate EVERYWHERE!! 


Main reason of this photo.. to show off his cute new nappy!  Cute right??

Recipe-
Ingredients
  • 1 3/4 cup flour
  • 2 1/4 cup caster sugar
  • 3/4 cup cocoa
  • 1 1/2 teaspoon baking powder
  • 1 1/2 teaspoon baking soda
  • 1 teaspoon salt
  • 2 eggs
  • 250ml Milk
  • 125 ml Vege or Conola Oil
  • 2 teaspoons Vanilla essence
  • 1 cup boiling water

Mix together all dry ingredients. Add eggs, essence, oil and milk and beat on medium speed for 2 mins (I mix it by hand:)). Stir in boiling water. Grease tin or line with grease proof paper. Bake at 180 degrees C for 55-60 mins (or until skewer comes out clean). It makes quite a big cake! Soooo yum!
Icing- I use chocolate butter cream icing cause its my fav and I google the recipe :)
Thanks Kylie for the recipe.. its one of my favourites!! 
xoxoxoox Laura loo


Casey's Fool Proof Cupcakes


Ok so I am sorry for all these baking posts :) But I really do LOVE baking. And possibly cupcakes are my favorite things to bake.. and eat :) They are seriously delicious, they look pretty and are easy to make. Its like goodness in a cup!! And slowly, with a lot of youtube research, I am learning how to pipe icing :)


Recipe-
Ingredients:

  • 125g softened butter
  • 1 tsp vanilla essence
  • 1/2 cup caster sugar
  • 2 eggs
  • 1 cup standard flour
  • 2 tsp baking powder
  • 1/4 cup milk
Directions
Preheat oven to 190'c
Cream butter, vanilla and sugar until light and fluffy
Add 1 egg and beat really well. Add another egg and beat again.
Sift flours and baking powder and fold into mixture. Stir in milk.
Spoon into paper cases (around 12)
Bake for about 14mins or until lightly brown

Frosting- I just google a butter cream icing recipe and do that :)
Thanks Casey for this recipe! Love it!

Happy days!!! Hope your Monday is going AMAZINGLY!
xoxox L

Monday, 18 February 2013

Chewy Chocolate Chip Cookies with Levi

A friend of mine gave me the idea of baking with Levi. I have tried before and well.. he was a pain, so haven't tried again. But last week thought it could be something fun for us to do together. Levi LOVES pretend cooking on his play stove.. so surely real cooking must be fun?
It was a partial success... and fun.. so it was more of a success than not. And that's the most important thing isn't it? But you should totally make these.. they are SOOO yummy. Kinda like Subway cookies. Very yum!


My VERY handy helper 

mmmmmmm....

The fruits of his "labours"... mmmmm again  

His healthy snack to balance his diet ;)

Photo doesnt do them justice.. seriously YUM

Lets just say they lasted less than 24hours, and  Stevo didn't have one.... :)

Recipe-
Ingredients
  • 2 cups all purpose flour
  • 1 tsp baking soda
  • 1/2 tsp salt
  • 3/4 cup melted butter
  • 1 cup packed brown sugar
  • 1/2 cup of white sugar
  • 1 TBS vanilla essence 
  • 1 egg
  • 1 egg yolk
  • 2 cups of chocolate chips (or substitute some for berries or nuts)
Directions
Preheat the oven to 165 degrees C. Grease cookie sheets or line with parchment paper.
Sift together the flour, baking soda and salt; set aside.
In a medium bowl, cream together the melted butter, brown sugar and white sugar until well blended. Beat in the vanilla, egg, and egg yolk until light and creamy. Mix in the sifted ingredients until just blended. Stir in the chocolate chips by hand using a wooden spoon. Drop cookie dough 1/4 cup at a time onto the prepared cookie sheets. .
Bake for 15 to 17 minutes in the preheated oven, or until the edges are lightly toasted. Cool on baking sheets for a few minutes before transferring to wire racks to cool completely.

xoxooxoxo L

Monday, 11 February 2013

Pretty Fabrics

Look at these gorgeous fabrics that have arrived, they're for gifts I am planning on sewing.. SOOO excited!


Week One of Organising Home Challenge

Wow so been doing the decluttering/organising/cleaning challenge for over a week now and loving seeing all the results :) Its SOOO much fun! Haven't stuck 100% to her guidelines because some days it's just not practical and I wanna play with the small people. But have got something done everyday.
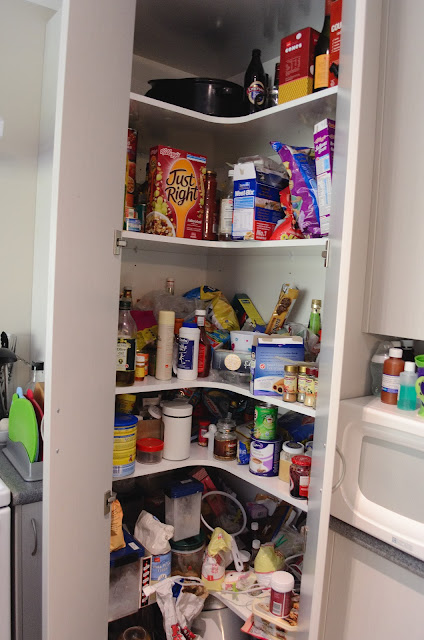
So far our bedroom has been done (although not the closets.. that's later), the pantry has been cleaned and reorganised (that was huge!! Since it was a big big big mess.) Lounge cleaned, dusted and decluttered. Leather couches cleaned and creamed. Linen cupboard reorganised. Washing machine and tumble dryer cleaned (who knew how gross and dirty they got.. really yuck!) And of course the other stuff I wrote about in day one. So getting there! I've found I am sleeping better with being more productive and really enjoying the kids and playing lots with them. Not missing all the time I spend on comp/ tv watching, like I thought I would.
The kitchen being tidied has seriously been awesome. I've done lots of baking cause the bench was tidy so I didn't have to do that first. I'm loving waking up to a tidy kitchen and bench.. its a good way to start the day!
Tomorrow is the bathroom. Don't know how much I will get done, as Avie and Levi are sick :(. But we will see :)

Pantry before and after.. (sorry its at an annoying angle!! Plus doesnt look that spectacular because need to get some more storage containers)


Bedroom ones to come..

xoxoxoox L

The Beginning of the Organising Challenge..

Day One: (See here for a full list of the tasks)

Oh and I forgot that I am going to be a geek and show you before and after photos of my tidying! Lucky you ;) So here's Day One.. before and after (hope you can tell the difference:)


xoxoxoxo Laura


A life of Purpose


So as you can see I have been "pimping" out my blog.. was slightly frustrating but I had fun in the end. BUT in the process managed to delete a whole load of posts.. made me grumpy to say the least. And since following up posts are related to the ones I deleted I thought I would recap what I wrote in the post formally known as "clearing the way for creativity". So if you have read it.. skip this post ;)
I am doing a series at church called Lioness Arising by Lisa Bevere. We are almost done now, and its been really thought inspiring and well, just plain inspiring. An aspect that really stood out to me is being "fully awake". She talks about a lot of times in our lives we are tranquilised, aware of whats going on but not actively living our lives. Living to get through each day and not really being purposeful or particularly productive. We get so swamped in being busy that we loose sight of our purpose and the stuff that we actually want to be doing. I kinda see it as treading water and sometimes going under slightly, bobbing along with where the current is going...instead of swimming to get to where we wanna go.
When I look at my life.. well a lot of the time I am traquilised. Asleep on the job.. like a zombie, getting stuff done but not really doing anything much of importance. Living each day to get the kids to bed so I can relax and then push repeat to the next day (Since my post on this simular topic a while ago life has changed for us.. but I think there is more room for change). And let me just put this in here now.. Obviously there are seasons in our life that are just plain busier then at other times. Like when you are a mum of small children, looking after them and cleaning the house etc. But I don't think it should be an excuse.. I really think society gives us mums of small children an "I'm WAY too busy" card, that we can pull at any time as an excuse. Obviously the expectations are different for me, then for say a single young person. But that doesn't mean that I can't live life awake and with purpose. And of course I still have to do the everyday tasks like laundry/house work/ laundry/laundry :)
So practically what does this look like? What's my main purpose at the moment? Well, it's to raise my kids into healthy, whole, well rounded, confident, loved adults who know God's love and know how to serve. Sometimes I loose sight of the fact that I am helping grow future adults in the blur of nappy changing, tantrums and toddlerness. So if that's my main purpose then I need to live my life in such a manor that reflects that. And honestly most of the time I'm not. I spend WAY too much time doing other things that really dont have any significant benefit in my life.. like watching bad tv and facebooking! I dont think at the end of my life  I am gonna look back and say "far out, I wish I had spent more time watching Home and Away or on Facebook" haha... well hopefully not! :) So instead of doing these mindless things I want to be playing with my kids.. spending quality time with them. Purposeful time!!
And so when I say.. "I'm WAY too busy".. that's  not all together true at all. I am busy, but if I find time (and it is A LOT of time to be honest) to watch telly/facebook then surely I could be using that time WAY more productively and satisfyingly... time spent doing stuff that I call, good for the soul. For me its being creative. Baking, making things, being crafty. For you it might mean other stuff. But for ages I haven't been doing these things because  "I'm WAY too busy" and because I'm "too busy" my house is a mess/ disorganised. So to fix this I have decided to do a 20 day Organise and Clean you House Challenge  by The Organised Housewife. A lot of the time I think.. hmm I'd like to do some sewing for example, but I know to even begin sewing I am going to have to riffle thru a big messy cupboard to find my buried fabric and machine.. and the cotton is who knows where. It would take me ages to find and then I would have to tidy the dinning table to find space to do it. It just makes me cringe thinking about it. So I dont. I sit on the couch and don't. BORING! So I figure if my household is decluttered and organised, if I wanna spend time doing a crafty thing/baking/whatever, it's there, organised and ready for me to do. Sounds like a plan aye :)
I think there are other ways that being "fully awake" applies to me and my life. Still figuring it all out. But the alarm clock is ringing in certain areas for sure! Watch this space!